How did you use new media technologies in the construction and research, planning and evaluation stages?
For the research, planning, construction and evaluation stages of my project I have used a wide range of technologies. My decisions were based on the technology that best fit the task at hand. Programmes I have used are as follows: DSLR camera and tripod, Camera, Celtex, The internet – google, YouTube, DaFont, twitter, Facebook, IMDb, Adobe Photoshop, Adobe InDesign, Adobe Premiere pro, iPhone 5s – applications, digital camera , slide share, google docs, word, PowerPoint, excel etc.
In this essay I will be illustrating how I used these technologies in my project. I will also analyse them, stating whether they were effective or no. I will sub divide the essay into four sections; Research, Pre-production, Production and Evaluation.
WordPress
WordPress is a content management system that allows users to blog freely. It was an essential for my coursework. Without it I wouldn’t have been able to present my coursework.
YouTube
YouTube throughout my whole project was a website that proved very useful and effective! YouTube is an uploading platform where you can publish your own videos. This is website was then fundamental for my coursework as I had to upload our trailer on YouTube.
I could watch tutorials on how to do and use certain things that I didn’t know how to use, quickly and efficiently. I could also use this website on the go, if I had to wait around for any reason I was able to stream a video on how to do something like ‘how to create a horror poster on Photoshop’. I could watch example works from previous students work, I could also watch professional works – real trailers for inspiration for our own trailer, and for my ancillary texts. YouTube saved me money as it is a free website with many resources!
Research
For the research stage of my coursework, I started with being assigned a preliminary task, where my group and I had to get familiar with the filming equipment that we had to use to film our final trailer product. We used the DSLR camera and tripod to create a six shot short movie with a title ‘Running from the Enemy’. This task proved very useful and only one of the three people in my group had ever used the camera properly in the past. So it helped build confidence with the functions of the camera like focusing (automatic and or manual), how to shoot the perfect shot i.e. getting in the correct positions – levelling, what I mean by this is how far away you should be when you are recording to still be heard clearly and to keep the quality at an optimum level. Distance would prove a very important factor. After this task my camera work was a lot better, i was still a novice but I understood the different buttons on the camera and what they do. This was important as we wanted to make our final trailer as best as it could be and that meant being able to stretch the functionality of the camera as far as possible to get the best results.
From shooting we had to edit the pieces together. For this we used Adobe Premier Pro, which is a application on an Apple Mac however it’s also accessible on a PC. This was another learning curve, as the whole group didn’t know how to use the programme. To overcome this we watch a few YouTube videos one being, ‘An introduction to premier pro CC’ by ‘David Clarke’ in this video illustrates how to set up a standard document, importing new videos to create sequences – this is prompted by the programme as an essential. It talks about the functions of the timeline, how to insert clips into it and edit them visually and auditory, it give shortcuts, it talks about sync locks for the video and for the audio – (editing the video and audio simultaneously), it shows you how you can change the layout of the functions so as the user you are comfortable. The video shows you how to edit the audio using the audio mixer etc. Premier pro was very effective for my whole project as it gave our work a professional touch, which was important to gain top marks.
Pre-production
For the pre-production stage of my coursework programmes that I used were as follows:
- YouTube
- Voice Memos (an application on my iPhone)
- Microsoft Word
- Microsoft PowerPoint
- IMDb (a film website)
I used YouTube and IMDb together. I used IMDb to find horror trailers as I am not a major fan of this genre I needed a guidance/list of movie choices. IMDb was useful to read reviews, synopsis of films and then went on YouTube watch the trailers of the movies I chose. Doing this was efficient as there is a large database of horror movies to choice from; old and new.
I used Voice Memos on my iPhone as a presentation tool for my blog. With this app I recorded myself presenting a blog post I had created so the viewer could listen as well as read the post. It made the post more interactive.
Microsoft word is a graphical and word processing program that allows the user to type documents out. It is a very useful program to document work without handwriting. It take us less time. This was perfect for the essay stages of my coursework. The programme also has literature advances that aids grammar, spelling and punctuation. This is a very useful asset to my coursework, I could use this programme with every stage.
Microsoft PowerPoint is a slide show presentation programme that allows the user to present work interactively. The user can create audience print outs and speaker notes. This programme was very useful for my coursework as it allowed me to present my work in different formats.
Production
Technologies I used for this stage of my coursework were as follows:
- Microsoft Word
- Google Docs
- Prezi
- Celtex
- Microsoft PowerPoint
- Slideshare
- Google maps
- DaFont
- Photoshop
- YouTube
- IPhone Camera
- Google images
- Hotmail
- I used the programme Microsoft Word to create tables for work such as schedule, and shot lists. As I have been using Microsoft word for many of my school years and last year college I am very familiar with the programme. I also do IT as an A level so I know what the majority of the functions do. Inserting a table is very easy all you have to do is go onto the insert tab at the top of the word processor window, and click on table. You can create them in two ways, using the drop down option and manually choosing how many rows by how many columns, or you can chose to use the ‘insert table’ tool where you can insert the specified number of rows and columns that you require.
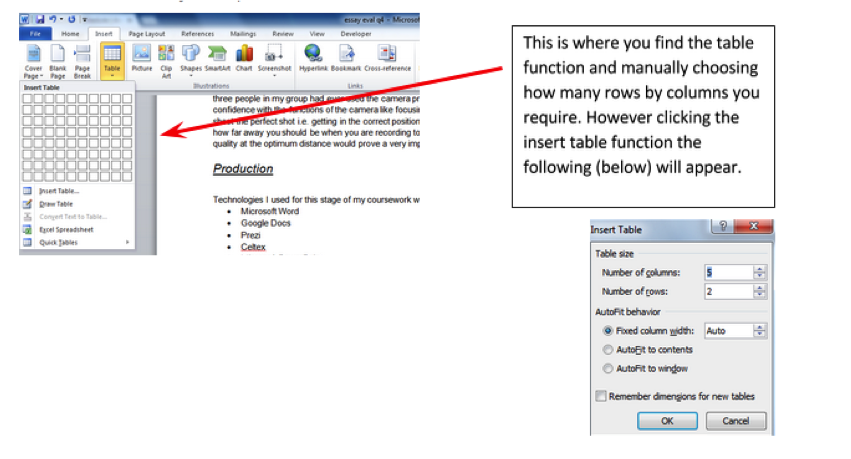
The posts I use the table function is the schedule and the shots list in the production section.
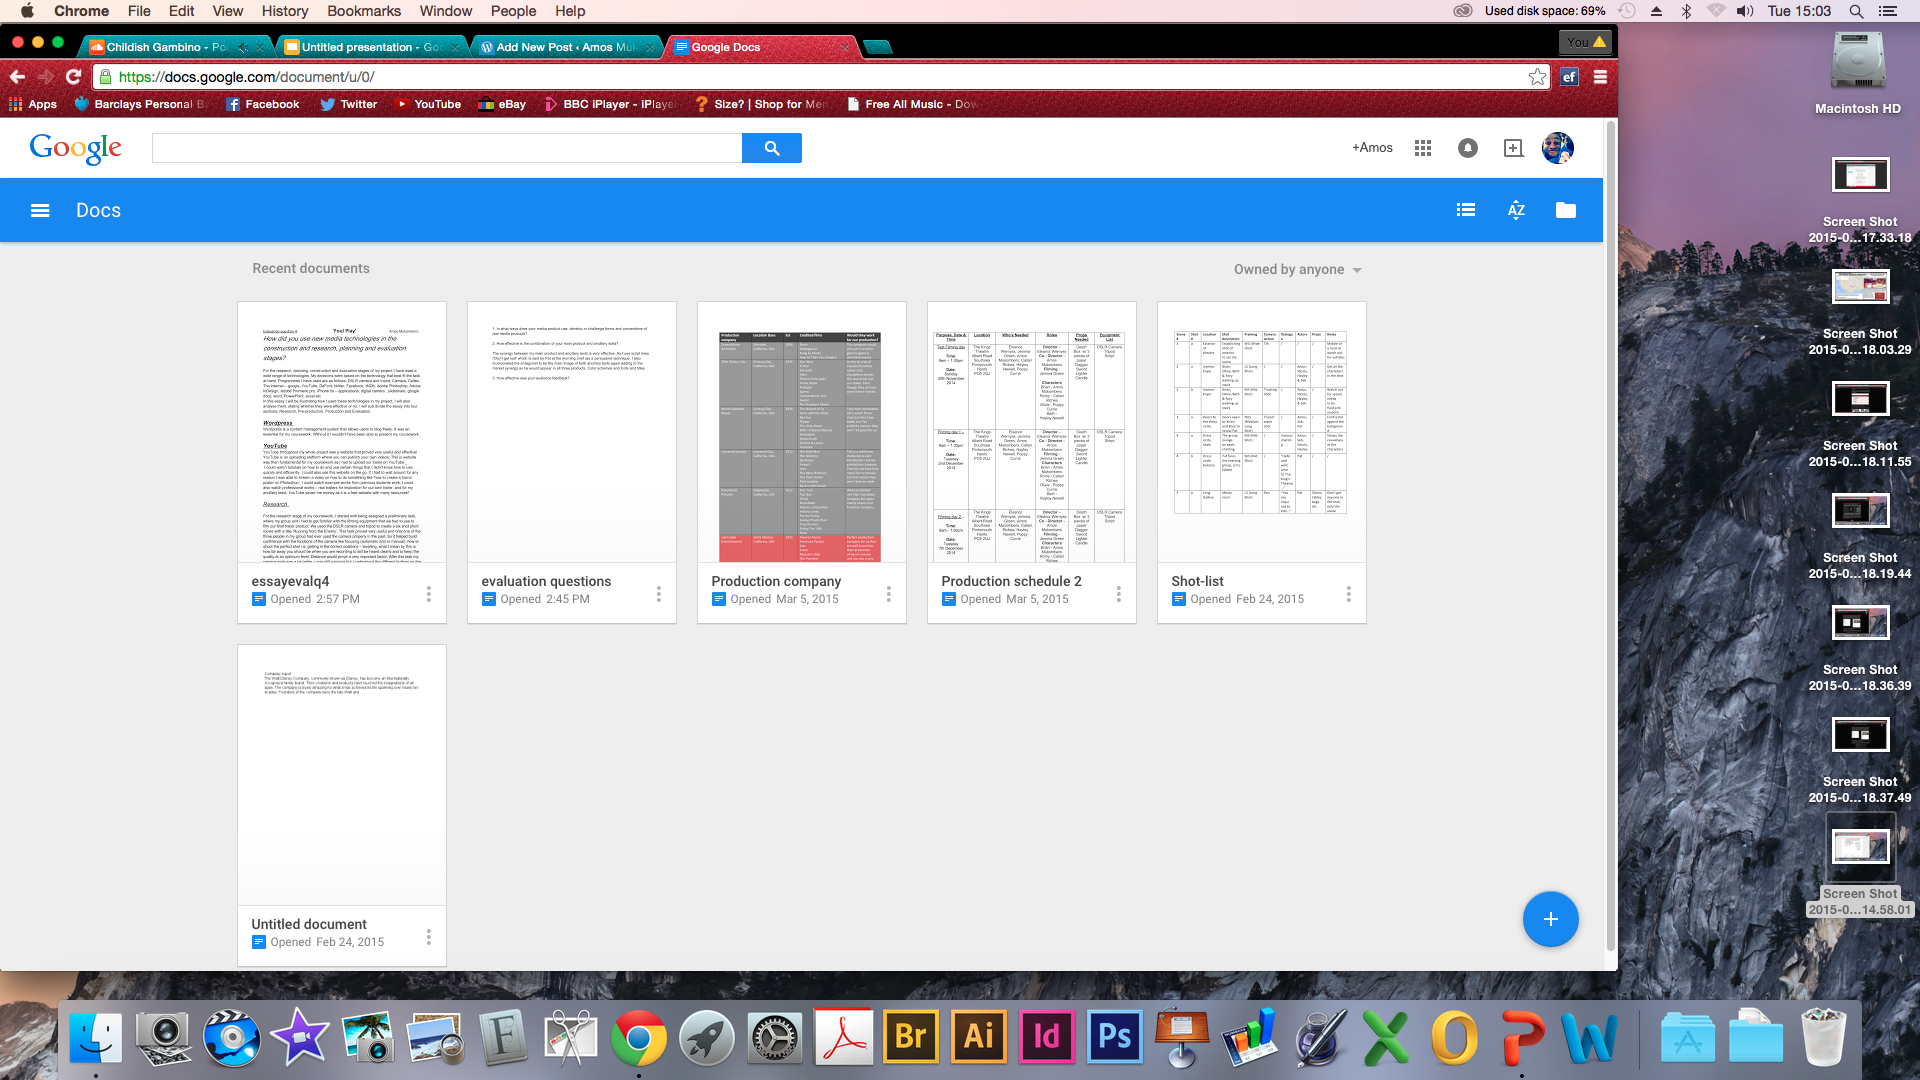
- Google docs is an application which allow you to create, format and edit documents online. These documents can be accessed in real time anywhere around the world. This is useful as I didn’t have to finish my work on a specific computer I could do my work on the go. I could even use Google docs on my phone and edit documents, so I had literally no excuse to not finish work as I could do it anywhere any time. This resulted in allowing me extra time for other parts of my coursework. Google docs were very useful as presenting tool; I could upload my Microsoft documents onto google docs and embed them into my blog. This looked better than copying and pasting the word document into a post. Google docs also enhanced my blog and made the posts smaller as you can scroll through the document in a window. This made my work it look more aesthetic pleasing.
This is what google docs looks like. The documents you see here are Word processed documents. Although you can upload a wide range of documents such as PDF’s, photo’s, PowerPoint slides and Microsoft Excel spreadsheets.
![]()
- Prezi is a presentation tool that I used as an alternative to Microsoft PowerPoint. Unlike PowerPoint Prezi allowed me to use one large canvas to present work. The tool allows you to pan and zoom various parts of the work which emphasises the work or part of the work that is being presented. This website was very helpful in my coursework as it made it more interesting to view rather than just reading an essay or just reading a standard blog. It allowed me to present my work differently.
This is an screenshot showing  what my Prezi presentation looked like. You would use the arrow keys on your keyboard to go through the different areas of the work. Scrolling with your mouse allows you to pan and zoom into a specific area if you don’t want to go through the pre-set order of the presentation.
This screen shot shows my Prezi presentation zoomed out, you can see a few of the parts of my work.

In this screenshot you can see a zoomed in part of the presentation. Each part of the presentation can be seen like this. The good thing about Prezi is it has elements of programmes such as PowerPoint where you can include animations and transitions.
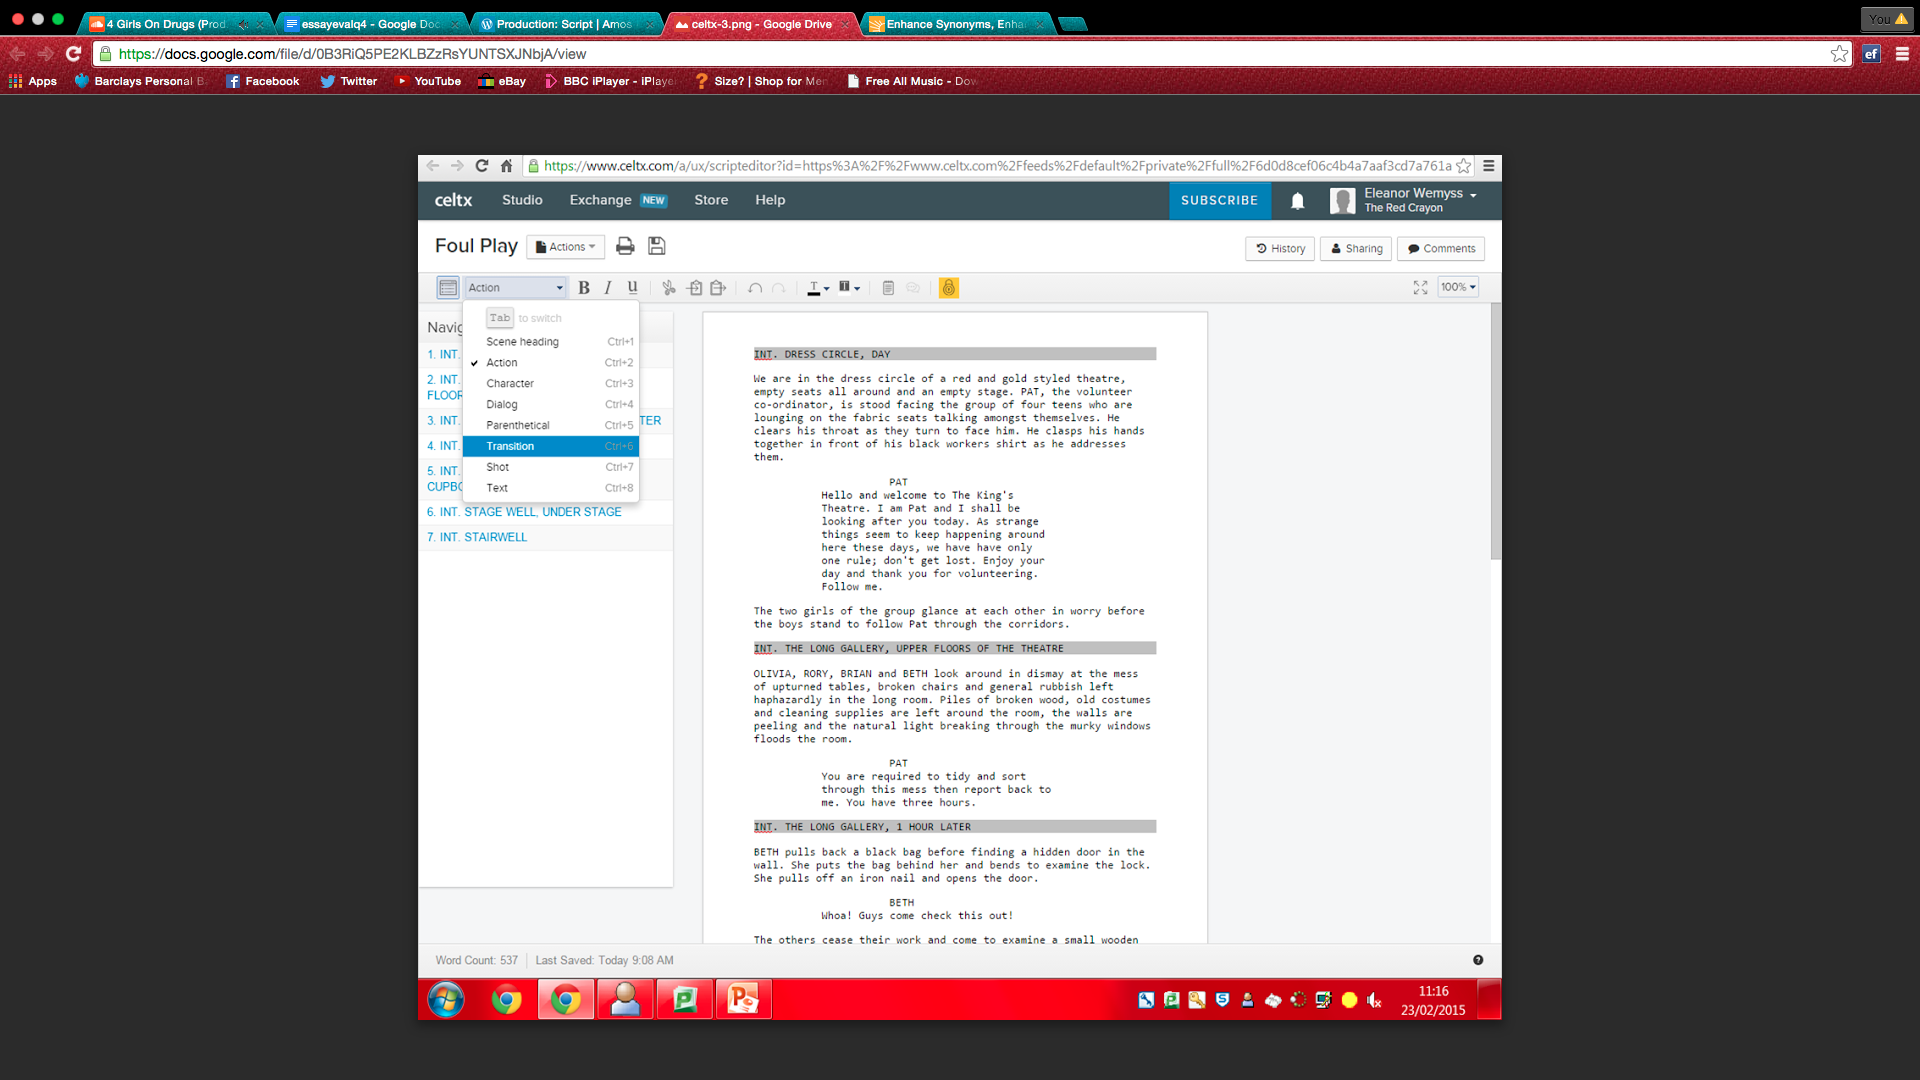
- “Celtx (ˈsɛlˌtɪks) is media pre-production software, designed for creating and organising media projects like screenplays, films, videos, stage plays, audio plays, documentaries, machinima, comics, games and podcasts.” – sourced from google search
This programme was a great asset to my coursework as we had to create a script. The programme allowed us to strengthen the professionalism within our work. which was perfect for optimising the best possible grades for us. Below is a screenshot of Celtx in action.
“Portable Document Format (PDF) is a file format used to present documents in a manner independent of application software, hardware, and operating systems. Each PDF file encapsulates a complete description of a fixed-layout flat document, including the text, fonts, graphics, and other information needed to display it.” – Sourced from google search.
PDF was also very important for our coursework as it is a file format that allowed us to present a large amount of our work. As we combined a lot of technologies and softwares and presented them on one blog, not all of the file formats with WordPress. So PDF was an effective tool.
- “SlideShare is a Web 2.0 based slide hosting service. Users can upload files privately or publicly in the following file formats: PowerPoint, PDF, Keynote or OpenDocument presentations. Slide decks can then be viewed on the site itself, on handheld devices or embedded on other sites.” – sourced from google
I used slide share to upload my powerpoint presentations into WordPress as it was compatible; I was unable to upload Microsoft power point directly to WordPress. So this website proved very helpful in my coursework. I used this website to present work such as – ‘Genre conventions’, ‘Location scouting’, Audience feedback’ and lots of other work. I was able to use the website through my whole coursework.
- “Google Maps is a desktop and mobile web mapping service application and technology provided by Google, offering satellite imagery, street maps, and Street View perspectives, as well as functions such as a route planner for traveling by foot, car, bicycle (beta test), or with public transportation.” – sourced from a google search
I used google maps in my location scouting to show what venues we used for filming, Rather than just presenting an address. It also helped us getting to the venue as I could use it on my iPhone to get directions from point a to point b.
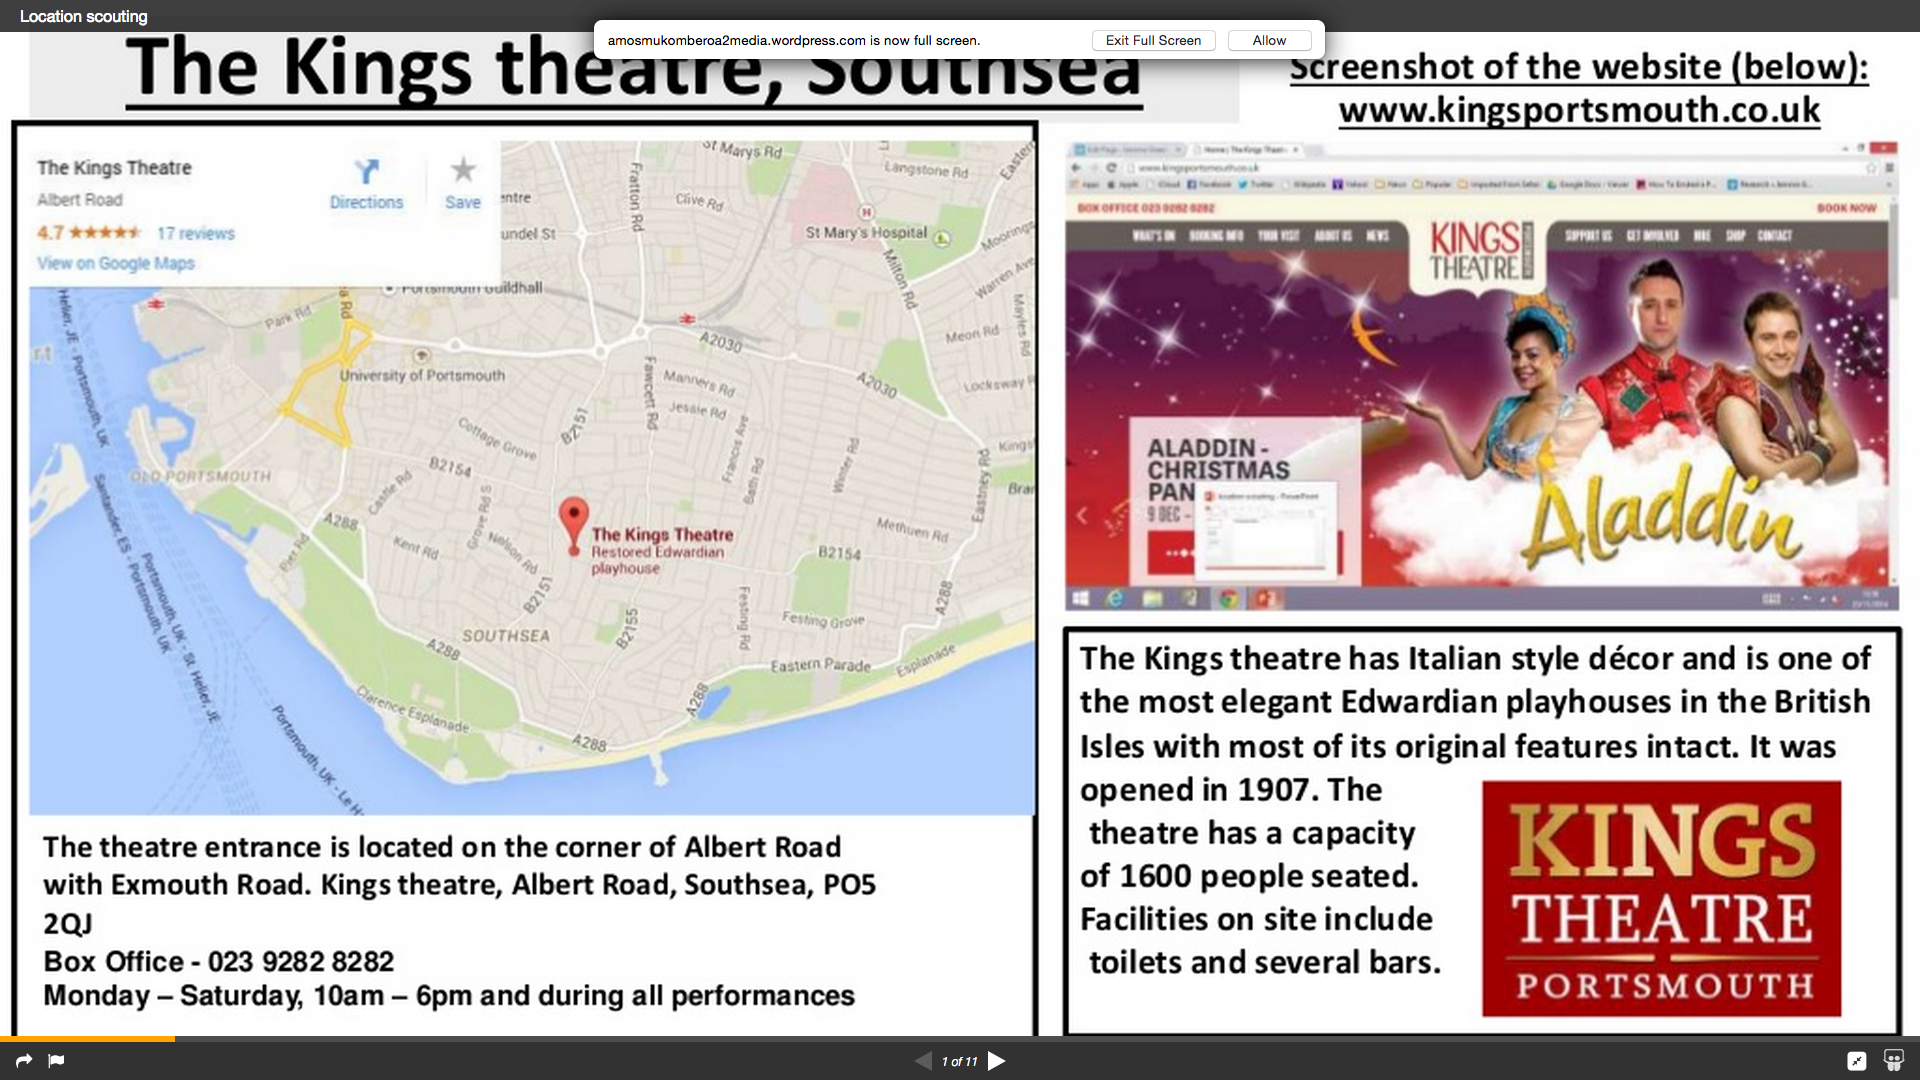
This screenshot shows google maps being used in location scouting. In my coursework.
- DaFont – is a website that allows the user to archive or download personalised fonts. I used the programme for inspiration in the design stages of my coursework on my production of magazine and poster. Initially I was going to download a font however I found it was very standardised so I was unable to edit the font effectively to work with my magazine or poster.

This is a screenshot showing the use of Dafont in my coursework in the poster creation post.
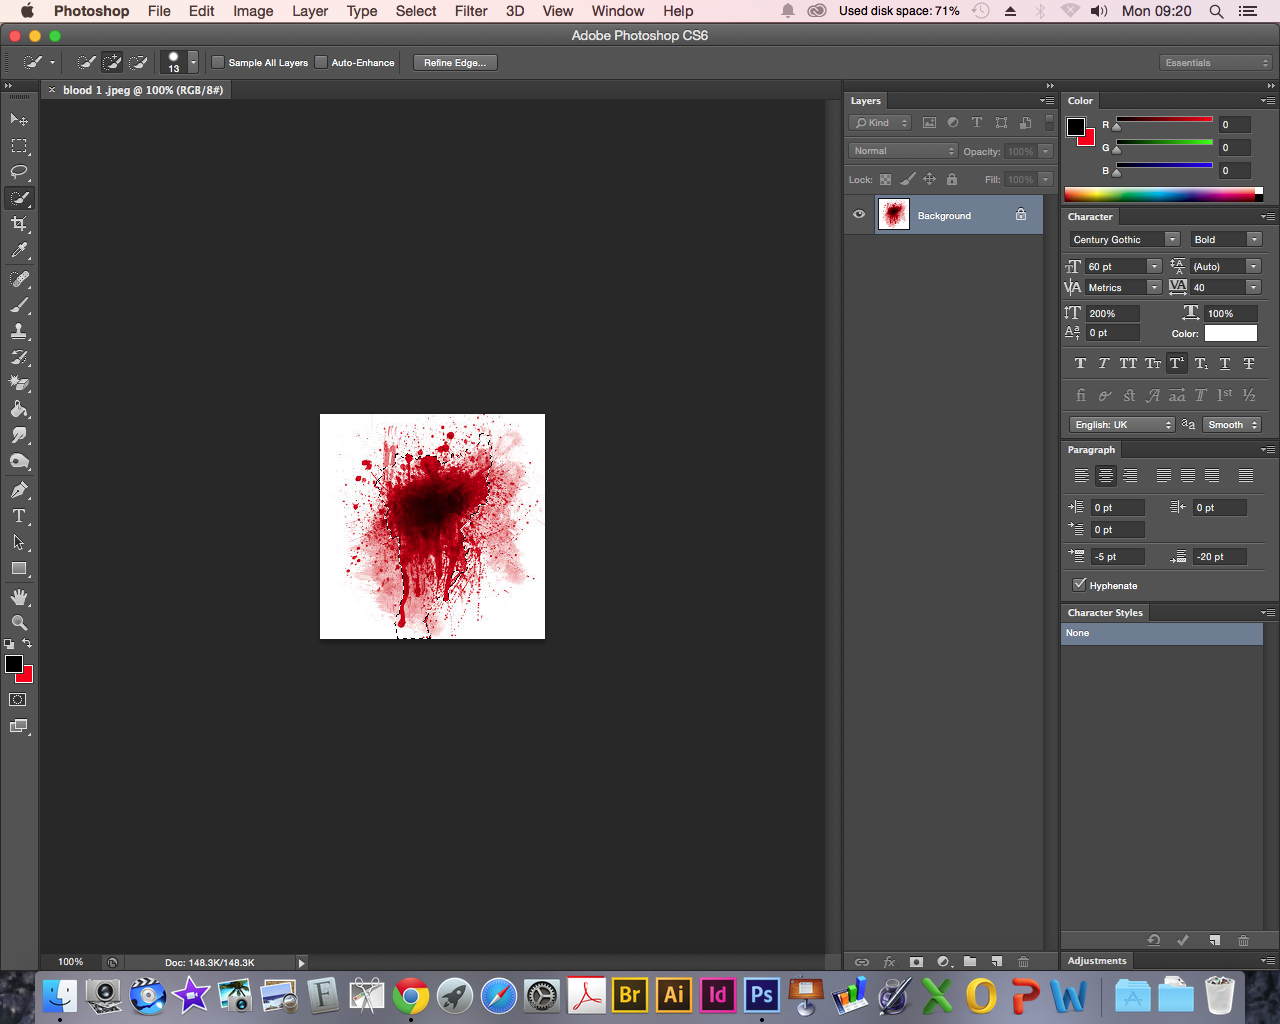
- Adobe Photoshop is a photo editing software that allows the user to change, manipulate, create and improve images. It was very important for my coursework as it allowed me to produce my Poster and Magazine. It allowed me to make my work as professional as possible as the programme is used industrially as well as for private use. However at the start of my coursework I was very unfamiliar with the software so for next time if I use new software I need to familiarise myself with it as I would save a lot more time doing so. Although teaching myself how to use the software made the coursework a lot more enjoyable!

This is a screenshot showing me using photoshop in my magazine and poster creation for my coursework.
Creating custom paint brushes was my favourite skill I learnt whilst using Adobe Photoshop. With this technique I was able to amplify the horror genre by making blood splatter paint brushes. With this tool I was able to make my poster look more horrific. I was inspired by the following video.
URL: https://www.youtube.com/watch?v=Fp5uUC8aLCk
In this trailer they incorporate the blood splatter in their title, using the custom paint brush.
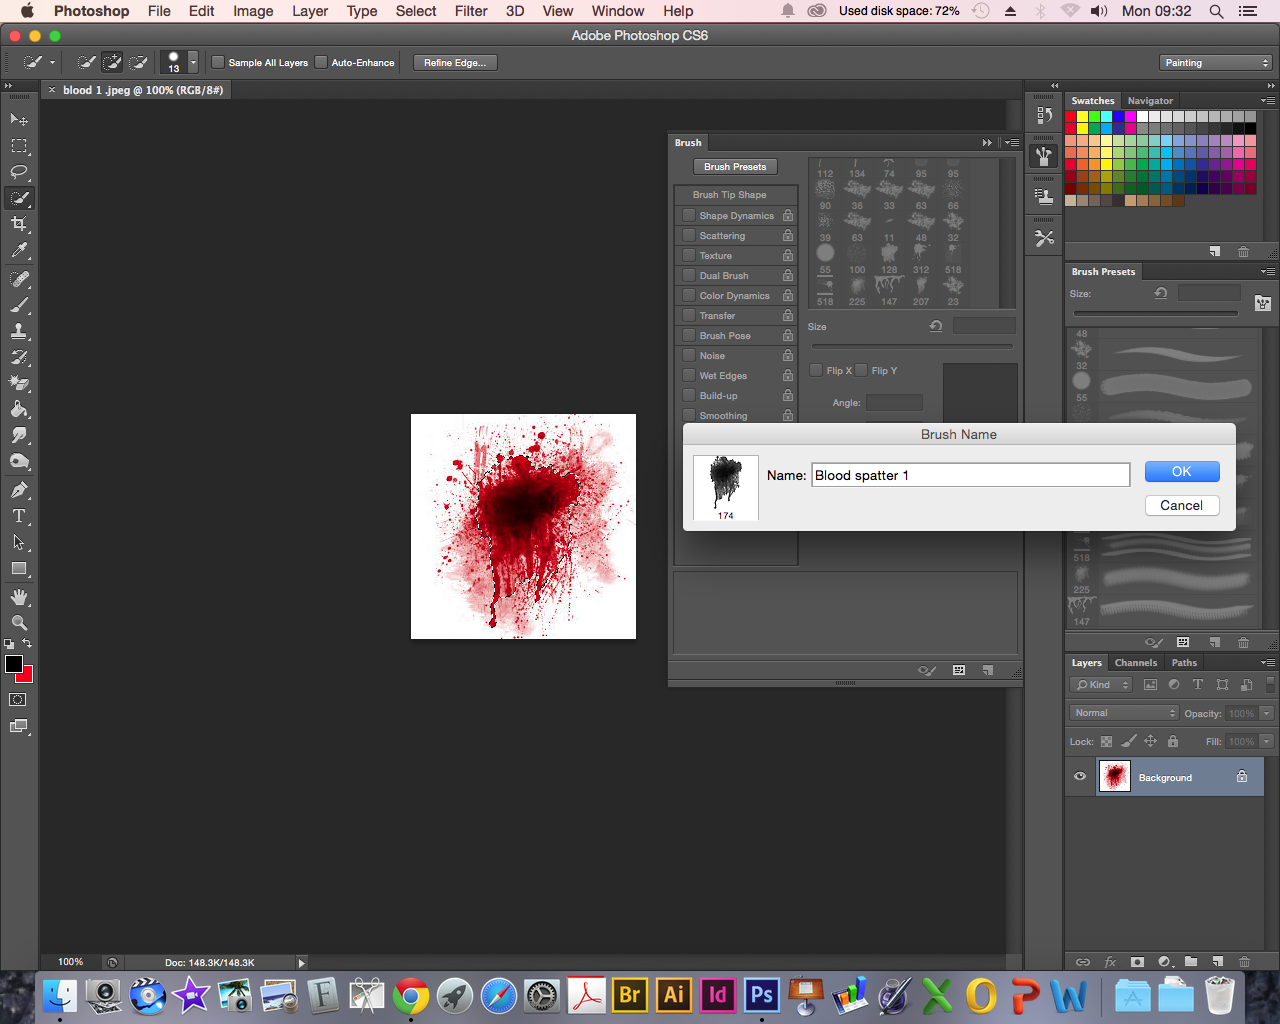
These were the steps I took to create the paint brush:
First of all I had to find a picture of a blood splatter that would work for my custom paint brush. I used the following pictures from google images.

I then had to open a new window in Adobe Photoshop with the blood spatter picture. With the picture I had to select the section of the blood spatter I wanted to use as a paint brush.
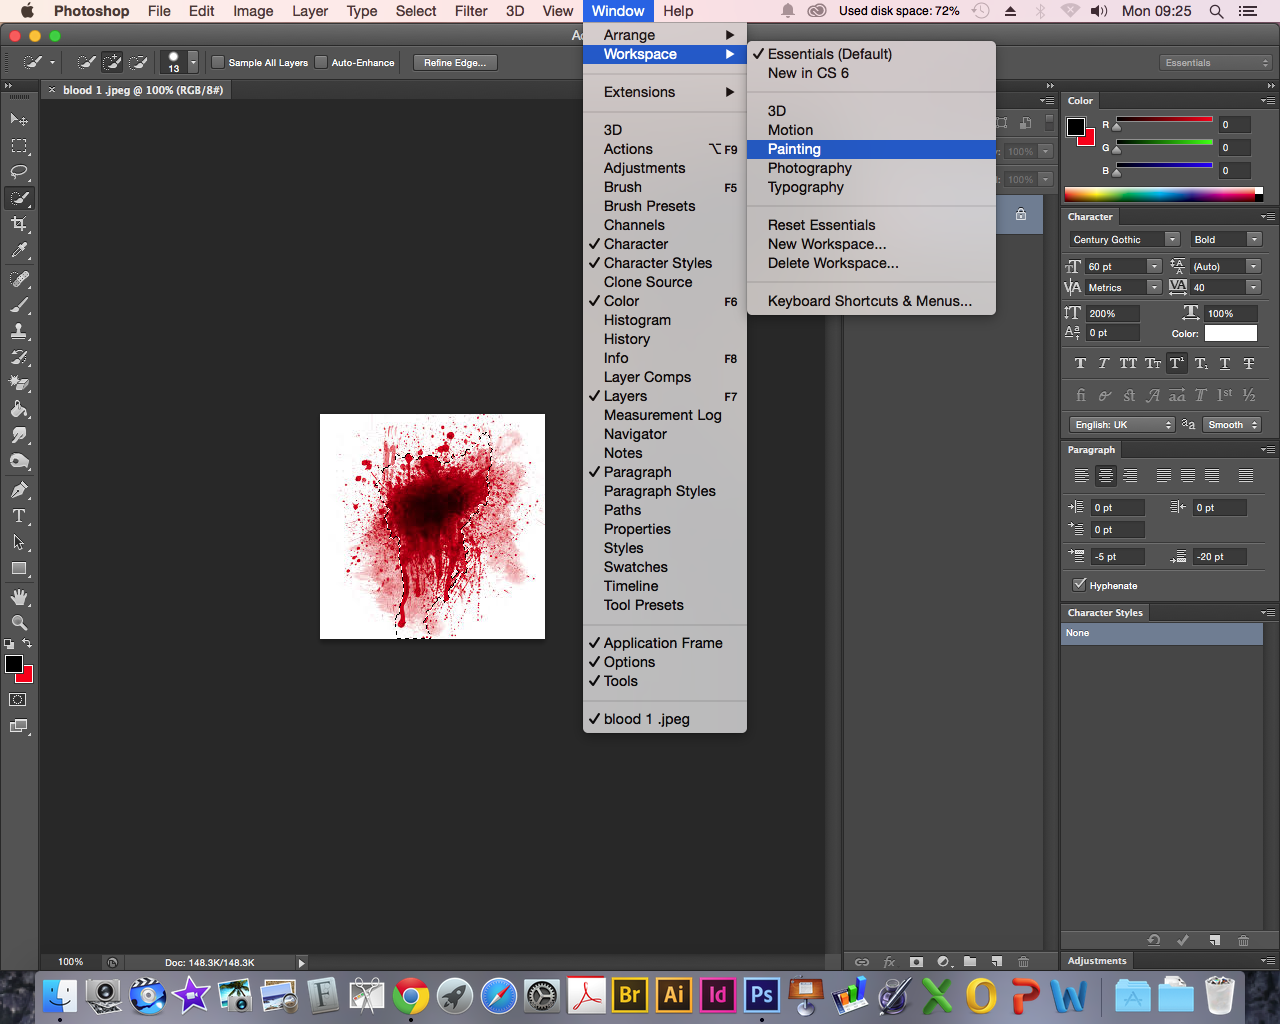
From then I changed the photoshop workspace to the painting This made changing the brushes and painting in general a lot easier.
I then clicked on the edit section on the options tab. This is where I found the Define brush preset – to create my custom paint brush.
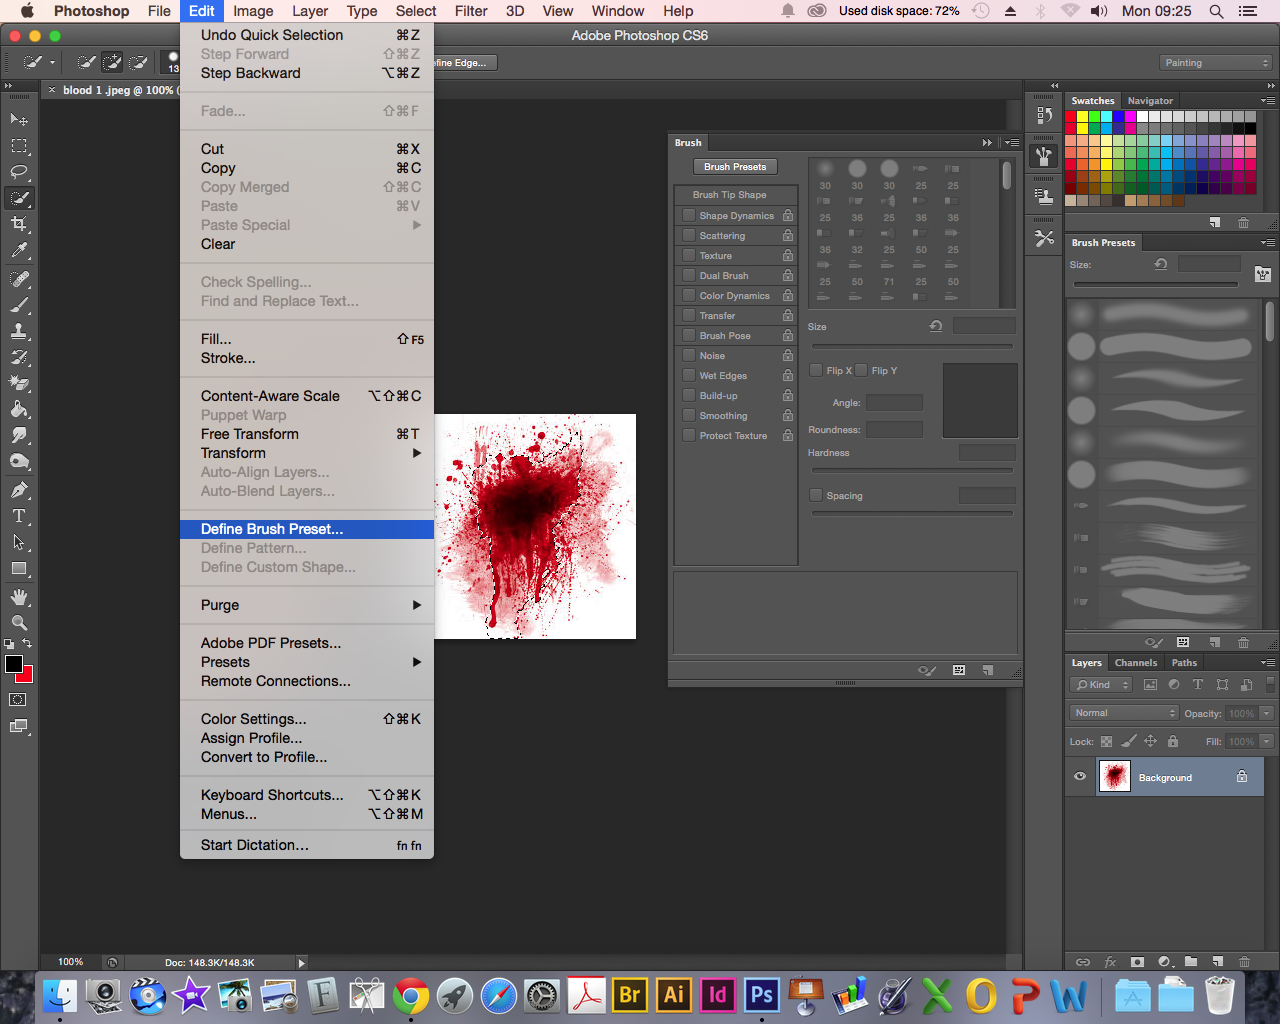
From here I then had to rename the paint brush and then save it to something I would recognise for the future.
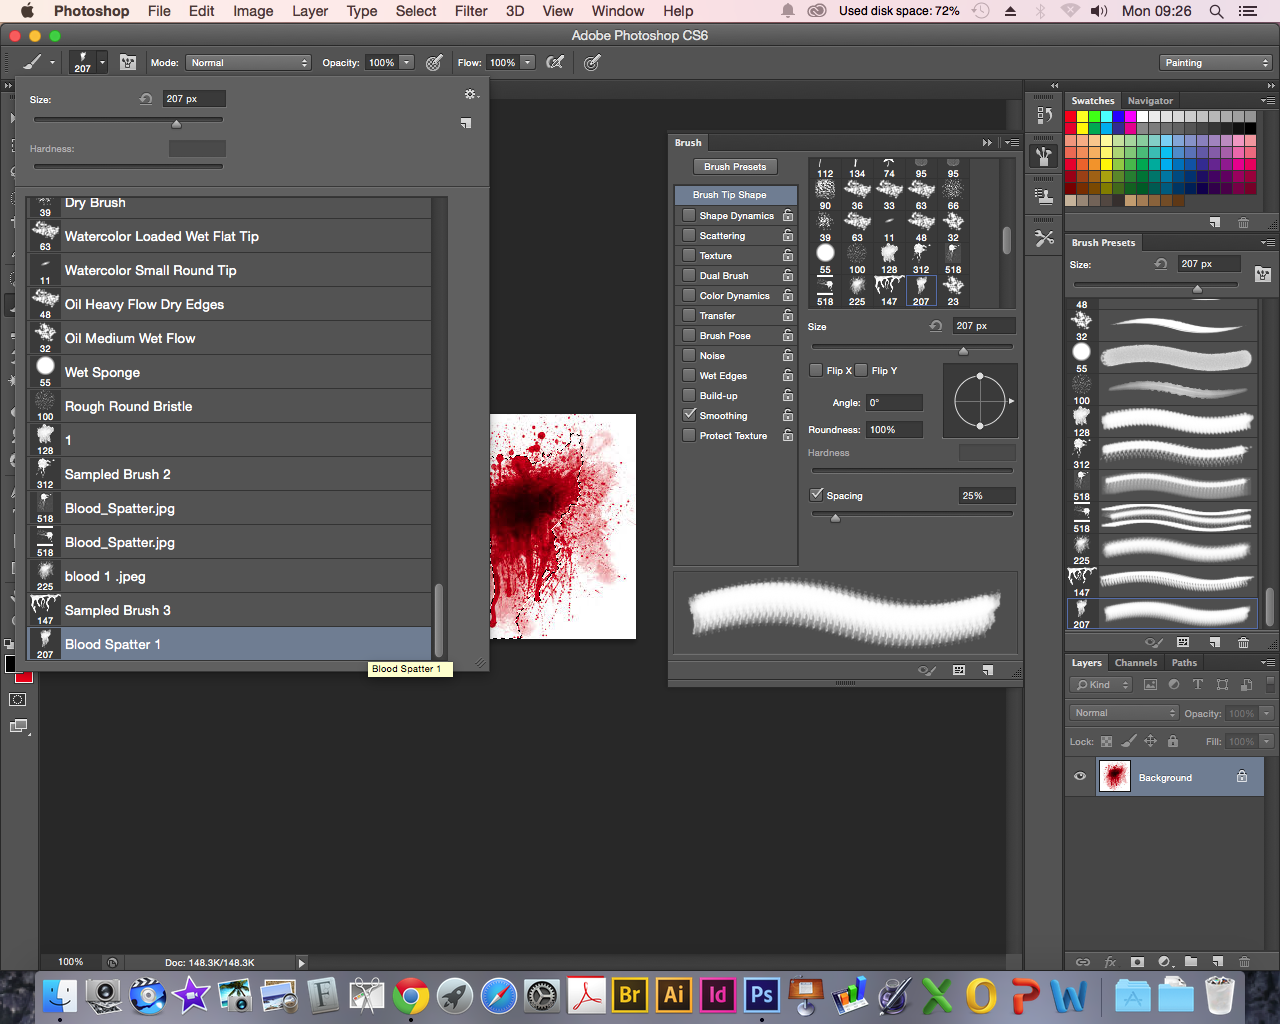
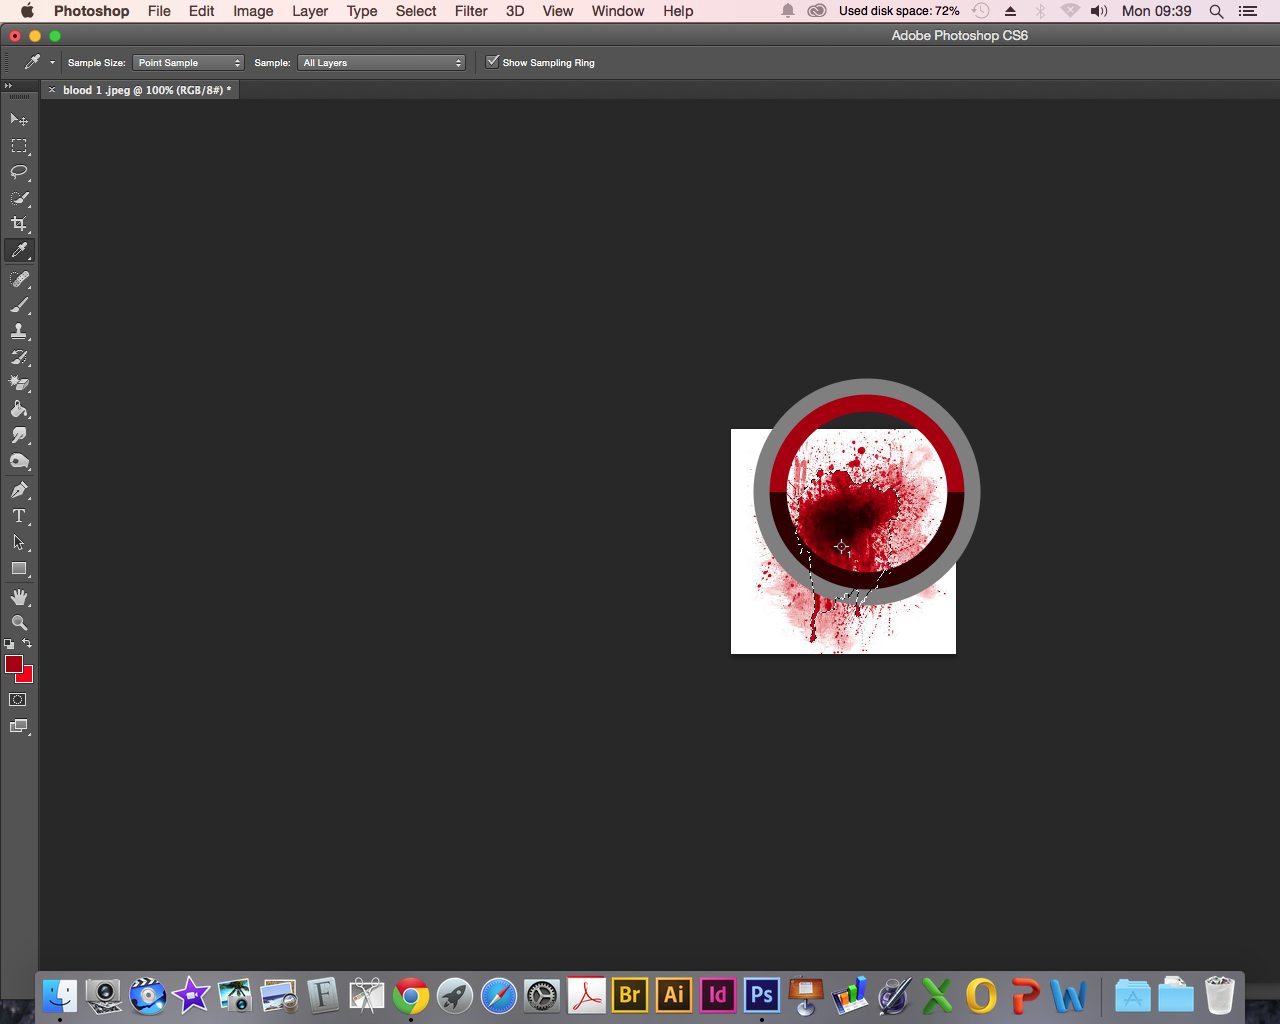
To use the new paint brush I had to click the drop down menu for all of the different paint brushes and scroll down until I found the new paint brush that I had created. At first the paintbrush was black but then I changed the colour to red. To make it look more like blood I had to change the shade of red to darker or lighter depending on what it looked like. I used the video as a guide for the shades of red. I could also switch between tabs on photoshop to use the eyedropper tool so I could get my blood to look as realistic as possible.
To used the eyedropper tool I clicked on the tool and changed windows to the blood spatter one and sampled different parts of the blood to make it look as realistic in colour as possible. If i clicked and held a filter would show the difference in the current colour to the new colour I would be changing to.
I also used this technique for my ‘Foul Play’ title. This use of technology was very effective for making my poster as blood is very conventional in horror based products.
- Google images browses the internet systematically to find an image that is related to keywords that you have entered into the search engine, and then gathers them all together. This website was an essential to my coursework as I used to to search for pre-existing examples of film posters and magazines. From this I could apply the conventions into my own work. It was a tool to comprise inspiration for my work.
- iPhone, I used this to take pictures, videos, surf the internet on the go, emailing/communicational purposes all in aid for my coursework. I used it in a variety of areas in my production, such as communicating with the rest of my group and for when i needed to research something on the go. It saved me time. I was also able to use a calendar app to set reminders on filming days and editing days so that I would not forget. My phone was a very powerful tool for my coursework. It was very efficient. However at times when I couldn’t reach the internet/network I could only use apps that didn’t require the internet or network to work.
- Facebook is a free social networking site that allows users to create profiles where they can converse with other users, post photos and videos on their profiles. I used Facebook for communicating with my group to exchange ideas through my coursework. We created a group message so it was quicker to communicate if we were not together and it saved time rather than sending individual messages.

This screen shot shows me using Facebook messaging in a post on my coursework. Where i am sharing pictures.
- Hotmail also known recently as Outlook is a web mailing website (emailing). This was an important website to use on my coursework as it allowed us to communicate with Kings Theatre. As they are a busy business we found it difficult to find a feasible time to contact them via phone so we emailed them requesting to have a few days of filming for our coursework trailer. Fortunately Eleanor (a member of my group) works there so she knew who to email.
Evaluation
For the evaluation stage of my project I decided to answer the pre-set questions with a different technological presentation technique. The reason for this was to show my technological abilities in an effective manner.
For question one I used Powtoon – which is an alternative to a powerpoint presentation, this was a fun interactive way to present information. I was able to use a variety of animations to make my work come alive. Powtoon also enabled me to use a wide range of multimedia operative such as pictures, text, video with the combination of music. This is an effective use of technology as it spiced up my work. The plus side to this programme is that you don’t need to be a professional to create professional looking work, that is why I enjoyed using it.
For question two of the evaluation I used Microsoft Powerpoint, I found that analysing the combination of my media products worked effectively using powerpoint using a series of pages and slides. Again with powerpoint I had the ability to use a range of multimedia making my work more aesthetically pleasing.
For the third question I decided to create magazine pages using the software Adobe InDesign and I enjoyed creating them in my AS year of this media course. I found it was better than finding another on-line presenting tool as there are a vast amount tools and features I could choose from! InDesign is a professional software that allowed the quality of my work to be at a high level.
For the last question I decided to write an essay using Microsoft word, this was effective as it allowed me to layout my essay in a simplistic and junk free manor. Technology is forever improving with the time and proves to play a massive part in our everyday lives. For my coursework I was able to use a wide range of technology to complete tasks, present work and communicate efficiently and effectively. All technologies I have used in my coursework have been very effective and helpful. Without it I would have been able to acquire the range of research material as was available to me and to present and create some work.
